
Docker Mastery: Complete Beginner to Advanced Guide (2026 Edition) is a practical docker guide on DevOpsLabX. In this tutorial, you will learn implementation steps, key commands, best practices, and production-ready patterns you can apply in real projects.
What is a Docker?
Docker is a containerization platform for developing, packaging, shipping and running the application.
It provides the ability to run an application in an isolated environment called a Conatiner
Makes deployment and development efficient.
Why do we need Docker?
Isolation of Dependencies: Docker allows you to encapsulate your application and its dependencies within a container. This ensures that your application runs consistently across various environments, eliminating the infamous "it works on my machine" problem. Developers can package everything needed for an application in a single container, ensuring consistency from development to production.
Portability: Docker containers are lightweight and can run consistently on any system that supports Docker, whether it's a developer's laptop, a test server, or a production environment. This portability simplifies the deployment process, reduces the likelihood of runtime issues, and enhances collaboration between development and operations teams.
Resource Isolation: Docker provides a lightweight form of virtualization through containerization. Each container runs as an isolated process, sharing the same kernel as the host operating system. This approach allows for efficient resource utilization, as containers share the underlying host OS resources without the overhead of full virtualization.
Scalability: Docker facilitates the deployment and scaling of applications by enabling the creation and replication of containers. With container orchestration tools like Docker Compose or Kubernetes, you can easily manage and scale your application across multiple containers, responding to varying levels of demand. This scalability ensures that your application can handle increased workloads effortlessly.
Consistent Build Environments: Docker enables the creation of reproducible and consistent build environments. With Docker, developers can define the environment in which their applications run, including specific versions of libraries and dependencies. This consistency from development to production streamlines the CI/CD pipeline, reducing the chances of errors arising from differences between development and production environments.
Microservices Architecture: Docker facilitates the adoption of microservices architecture, where applications are built as a collection of loosely coupled, independently deployable services. Each microservice can be packaged and deployed as a Docker container, allowing teams to update and deploy individual components without affecting the entire application. This modularity enhances agility and enables faster release cycles.
What is a Container?
A way to package an application with all the necessary dependencies and configuration.
It can we easy to shared.
Makes deployment and development efficient.
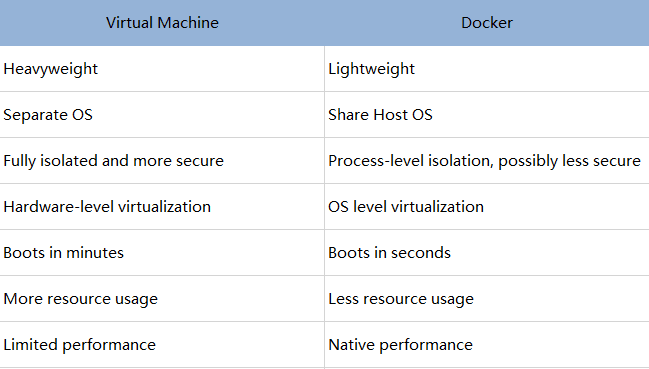
Docker vs Virtual Machine (VM).
Components of Docker.
Dockerfile:- Docker builds images automatically by reading the instructions from a Dockerfile which is a text file that contains all commands, in order, needed to build a given image.

Docker Image:- A Docker image contains application code, libraries, tools, dependencies and other files needed to make an application run. When a user runs an image, it can become one or many instances of a container. It act as a set of instructions to build a Docker container.
Docker Container:- A container is an isolated environment for your code. This means that a container has no knowledge of your operating system, or your files. It runs on the environment provided to you by Docker Desktop. Containers have everything that your code needs in order to run, down to a base operating system. You can use Docker Desktop to manage and explore your containers.
Docker registry:- A Docker registry is a system for storing and distributing Docker images with specific names. There may be several versions of the same image, each with its own set of tags. A Docker registry is separated into Docker repositories, each of which holds all image modifications. The registry may be used by Docker users to fetch images locally and to push new images to the registry (given adequate access permissions when applicable). The registry is a server-side application that stores and distributes Docker images. It is stateless and extremely scalable.

What is Docker Hub?
- Docker Hub is a repository service and it is a cloud-based service where people push their Docker Container Images and also pull the Docker Container Images from the Docker Hub anytime or anywhere via the internet. It provides features such as you can push your images as private or public. Mainly DevOps team uses the Docker Hub. It is an open-source tool and freely available for all operating systems. It is like storage where we store the images and pull the images when it is required. When a person wants to push/pull images from the Docker Hub they must have a basic knowledge of Docker. Let us discuss the requirements of the Docker tool.
Docker Installation on Linux (Ubuntu).
- To install Docker on Linux, you can follow these general steps. Note that specific commands might vary slightly depending on the Linux distribution you are using.
Update Package Repositories:
- Open a terminal and ensure that your package repositories are up-to-date.
sudo apt update
Install Docker Dependencies:
- Install the necessary dependencies for Docker.
sudo apt install -y apt-transport-https ca-certificates curl software-properties-common
Add Docker GPG Key:
- Add the Docker GPG key to ensure the authenticity of the Docker package.
curl -fsSL https://download.docker.com/linux/ubuntu/gpg | sudo gpg --dearmor -o /usr/share/keyrings/docker-archive-keyring.gpg
Set Up Docker Repository:
- Add the Docker repository.
echo "deb [signed-by=/usr/share/keyrings/docker-archive-keyring.gpg] https://download.docker.com/linux/ubuntu $(lsb_release -cs) stable" | sudo tee /etc/apt/sources.list.d/docker.list > /dev/null
Install Docker:
- Install Docker Engine.
sudo apt update
sudo apt install docker-ce docker-ce-cli containerd.io
Enable and Start Docker Service:
- Start the Docker service and enable it to start on boot.
sudo systemctl start docker
sudo systemctl enable docker
Verify Docker Installation:
- Check if Docker is installed and running.
docker --version
If you encounter any issues, refer to the Docker documentation for troubleshooting or specific instructions for your Linux (ubuntu) distribution.
Creating a demo Project (React Web-App).
Let's embark on a journey to create a simple React web app and containerize it using Docker. This step-by-step guide will help you understand how to set up a Dockerized development environment for your React project.
Installing the Nodejs.
- Open a terminal and run the following command to install Nodejs on Ubuntu.
sudo apt update
sudo apt install nodejs
node -v
Initialize a React App:
- Open a terminal and run the following command to create a new React app using Create React App.
npx create-react-app test-app
This will create a new directory named "test-app" with a basic React project structure.
Navigate to the Project Directory:
- Change into the project directory.
cd test-app
Create a Dockerfile:
- Create a file named in the project root. This file defines the configuration for building the Docker image.
vim Dockerfile

Build the Docker Image:
- Open a terminal and build the Docker image from the project directory.
sudo docker build test-app
This command builds an image with the tag "test-app".
Run the Docker Container:
- After the image is built, run a Docker container from the image.
docker run -p 3000:3000 -d test-app
This command runs the container in detached mode and maps port 3000 on your local machine to port 3000 inside the container.
Run a Docker Image in Detached Mode:
Detached mode allows you to start the container and then let it run in the background while you continue working on other tasks in your terminal.
To run a container in detached mode, you use the "-d" flag with the "docker run" command. For example, the following command starts an instance of the "nginx" web server in detached mode:
docker run -d test-app
Access the React App:
- Open a web browser and navigate to
http://localhost:3000. You should see your React app running inside the Docker container.

Docker images (docker image ls):
- List images
docker image ls
docker image list
docker images

Remove the Images:
- When you're done, remove the Docker images.
docker rmi test-app
Stop and Remove the Container:
- When you're done, stop and remove the Docker container.
docker stop test-app (stop)
docker rm test-app (remove)
These commands stop and remove all containers based on the "test-app" image.
Docker Container With Interactive Mode:
Sometimes you'll need to get inside a Docker container to perform tasks such as installing software packages or troubleshooting a running container.
When running a container in interactive mode, you can access the container’s shell. A shell is basically a command-line interface that allows you to communicate with the operating system by entering text commands. Using the shell, you can run commands and interact with the container as if you were working on your local computer's terminal.
To run a Docker image in interactive mode, you can use the "-it" flag with the "docker run" command, followed by the name of the image you want to run.
Note that the "-it" flag is a combination of two separate flags: "-i" and "-t".
The "-i" flag stands for "interactive". It ensures that you can type and run commands on the container’s shell. The "-t" flag stands for "TTY," which refers to the ability to emulate a terminal inside a container. It makes it easier to read and interact with the container's output.
For example, to run an instance of the "nginx" image in interactive mode, you can use the following command:
docker run -it nginx
Sharing Image to DockerHub:
- Now that you've built an image, you can share it. To share Docker images, you have to use a Docker registry. The default registry is Docker Hub and is where all of the images you've used have come from.
Create a repository
To push an image, you first need to create a repository on Docker Hub.
Sign up or Sign in to Docker Hub.
Select the Create Repository button.
For the repository name, use
demo-project.Make sure the Visibility is Public.Select Create.
In the following image, you can see an example Docker command from Docker Hub. This command will push to this repository.
Login to Docker Hub.
To login docker Hub, you can use the following commands:
docker login
Pushing image to Docker Hub:
- You can now execute the final command required to send your image to Docker Hub:
docker push rahuldss88/demo-project:01
How to Pull Image?
- To pull an image from Docker Hub, you can use the
docker pullcommand. Here's the basic syntax:
docker pull <image name>
Replace <image_name> with the name of the Docker image you want to pull. If you want a specific version or tag of the image, you can include it in the name. For example:
docker pull ubuntu:latest
This command pulls the latest version of the Ubuntu image from Docker Hub.
- If you don't specify a tag, Docker will default to pulling the "latest" tag. Once the pull is complete, you can run containers based on that image using the
docker runcommand.
What is Docker Volumes?
- In Docker, a volume is a way to persistently store data outside of a container, allowing data to be shared between containers and persisting data even if the container is removed. Volumes provide a flexible and efficient solution for managing data in Dockerized applications.
Here are some key points about Docker volumes:
Data Persistence: Volumes exist outside the container filesystem and persist even if the container is stopped or removed. This allows data to be shared among containers or retained between container restarts.
Isolation: Volumes can be mounted into one or more containers, providing a way to share data between them while maintaining isolation of the application itself.
Easier Backups and Restoration: Since data is stored in volumes, it becomes easier to back up and restore important information. You can also use named volumes, making it easier to reference and manage.
Volume Types:
Named Volumes: These are volumes with a specific name that you can create and manage explicitly.
Anonymous Volumes: These are automatically created and managed by Docker, typically used when a container needs a temporary storage location.
Mounting Volumes: Volumes can be mounted into containers at specific paths. This means that the container can read from and write to the volume as if it were a local directory.
Here's a basic example of using a named volume in Docker:
# Create a named volume
docker volume create mydata

# Run a container and mount the volume
docker run -d -v mydata:/app/data my_image
In this example, a volume named mydata is created, and a container is run with the volume mounted at the path /app/data inside the container.
Volumes play a crucial role in Docker when it comes to managing and persisting data for containers. They are particularly useful for databases, file storage, and any other scenario where persistent data is required.
Mount Bind in Docker:
In Docker, the
--mountoption allows you to attach a filesystem mount to a container. When you want to use a bind mount, you can specify the source and target paths for the mount. A bind mount is a way to mount a file or directory from the host machine into a Docker container, and changes made in either the container or on the host are reflected in both places.Here is the basic syntax for using
--mountto create a bind mount:
docker run -d --mount type=bind,source=/host/path,target=/container/path my_image
Explanation of the options:
type=bind: Specifies that it is a bind mount.source=/host/path: The path on the host machine that you want to mount into the container.target=/container/path: The path inside the container where you want to mount the source.
Here's a more concrete example:
        # Create a directory on the host
        mkdir /hostdata

        # Run a container with a bind mount
        docker run -d --mount type=bind,source=/hostdata,target=/containerdata my_image
In this example, the
/hostdatadirectory on the host machine is mounted into the/containerdatadirectory inside the running Docker container.Bind mounts are useful for scenarios where you want to share data between the host and the container, and changes should be visible in both places. However, keep in mind that bind mounts might have security implications, as the container has direct access to the host filesystem. Additionally, bind mounts are not supported on Windows containers when using Docker Desktop. In such cases, you might want to consider using volumes for cross-platform compatibility.
Docker Network:
Docker provides networking features that allow containers to communicate with each other and with the outside world. Here are some key concepts and commands related to Docker networking:
Bridge Network:
Docker creates a default bridge network named
bridgewhen it is installed. Containers connected to the same bridge network can communicate with each other by default.To create a user-defined bridge network:
docker network create mynetworkYou can then connect containers to this network during their creation:
  docker run -d --name container1 --network mynetwork my_image1
  docker run -d --name container2 --network mynetwork my_image2
Host Network:
Containers can share the host network, eliminating network isolation between the host and the containers.
docker run -d --name container1 --network host my_image1Be cautious when using the host network, as it exposes container ports directly on the host.
Overlay Network:
Overlay networks are used for connecting containers across multiple Docker hosts, typically in a swarm mode cluster.
docker network create --driver overlay myoverlayContainers in the overlay network can communicate with each other across different hosts.
Macvlan Network:
Macvlan allows you to assign a MAC address to a container, making it appear as a physical device on the network.
docker network create --driver macvlan --subnet=192.168.1.0/24 --gateway=192.168.1.1 -o parent=eth0 mymacvlanThis can be useful for scenarios where containers need to appear as separate devices on the network.
Inspecting Networks:
You can inspect a network to view details such as connected containers, IP addresses, and more.
docker network inspect mynetwork
Connecting and Disconnecting Containers:
You can connect existing containers to a network or disconnect them as needed.
  docker network connect mynetwork container_name
  docker network disconnect mynetwork container_name
Port Mapping:
When running a container, you can map ports between the host and the container to allow external access.
docker run -d -p 8080:80 my_imageIn this example, the host's port 8080 is mapped to the container's port 80.
These are some of the basic concepts and commands related to Docker networking. Understanding and utilizing Docker networking features allows you to create flexible and scalable containerized applications.
What is Docker Compose?
Docker Compose is a tool for defining and running multi-container Docker applications. It allows you to use a YAML file to configure your application's services, networks, and volumes, making it easy to set up and run complex, multi-container applications with a single command. Docker Compose simplifies the process of defining, deploying, and managing multi-container Docker applications.
Key features and concepts of Docker Compose:
Docker Compose YAML File:
The configuration for a Docker Compose application is defined in a YAML file named
docker-compose.yml.This file contains specifications for services, networks, volumes, and other configuration options.
Services:
Each containerized application component (e.g., a web server, a database, etc.) is defined as a service in the
docker-compose.ymlfile.Services can include configuration options such as the Docker image to use, environment variables, volume mounts, and more.
Networks:
Docker Compose creates a default network for the services defined in the
docker-compose.ymlfile.Additional user-defined networks can be created to allow communication between specific services or to isolate different parts of the application.
Volumes:
Volumes can be defined in the
docker-compose.ymlfile to persist data outside of the containers.This allows data to be shared and retained even if containers are stopped or removed.
Environment Variables:
- Docker Compose allows you to set environment variables for services, making it easy to customize container behavior.
Command Line Interface:
Docker Compose provides a command-line interface (CLI) for managing the complete lifecycle of your application, including starting, stopping, and scaling services.
Common commands include
docker-compose up,docker-compose down,docker-compose ps, and more.
Scaling Services:
With Docker Compose, you can scale services by specifying the desired number of replicas for each service.
For example, to run three instances of a web service:
docker-compose up --scale web=3
Integration with Docker Swarm:
- Docker Compose is often used in conjunction with Docker Swarm to deploy and manage multi-container applications in a clustered environment.
To use Docker Compose:
Create a
docker-compose.ymlfile in your project directory.Define your services, networks, and volumes in the YAML file.
Run
docker-compose upto start the defined services.
Docker Compose simplifies the process of managing multi-container applications, making it an essential tool for development, testing, and deploying containerized applications in various environments.
A Compose file looks like this:
  services:
    web:
      build: .
      ports:
        - "5000:5000"
      volumes:
        - .:/code
    redis:
      image: redis
Docker Compose for multiple containers:
To provide a simple example, let's consider a basic Docker Compose configuration for a web application with a front-end service (e.g., a web server) and a back-end service (e.g., a database). Here's a basic docker-compose.yml file for this scenario:
version: '3'
services:
  web:
    image: nginx:latest
    ports:
      - "80:80"
    volumes:
      - ./web-content:/usr/share/nginx/html

  db:
    image: mysql:latest
    environment:
      MYSQL_ROOT_PASSWORD: example_password
      MYSQL_DATABASE: mydatabase
      MYSQL_USER: myuser
      MYSQL_PASSWORD: mypassword
    volumes:
      - db-data:/var/lib/mysql

volumes:
  db-data:
Explanation:
The
docker-compose.ymlfile defines two services (webanddb) and a named volume (db-data).The
webservice uses the official Nginx image, maps port 80 on the host to port 80 in the container, and mounts a local directory (./web-content) into the container's/usr/share/nginx/htmldirectory.The
dbservice uses the official MySQL image, sets environment variables for the root password and database configuration, and mounts a volume (db-data) to persist MySQL data.The
volumessection at the end defines the named volumedb-data.
To use this configuration:
Create a new directory for your project and place the
docker-compose.ymlfile in it.Create a directory named
web-contentin the same location as yourdocker-compose.ymlfile. You can place your web content (HTML files, etc.) in this directory.Open a terminal, navigate to your project directory, and run the following command:
docker-compose upThis command will download the necessary images, start the defined services, and bind the specified ports.
Access your web application by opening a web browser and navigating to
http://localhost. You should see the default Nginx welcome page.When you're done, you can stop and remove the containers using:
docker-compose downThis is a simple example, and your actual Docker Compose configuration will depend on the specific requirements of your application. Customize the
docker-compose.ymlfile based on the services, networks, volumes, and other configurations needed for your multi-container application.
Docker Compose with Network:
Certainly! Let's enhance the previous example by adding a custom user-defined network to facilitate communication between the services. Here's an updated docker-compose.yml file:
version: '3'
services:
  web:
    image: nginx:latest
    ports:
      - "80:80"
    volumes:
      - ./web-content:/usr/share/nginx/html
    networks:
      - mynetwork

  db:
    image: mysql:latest
    environment:
      MYSQL_ROOT_PASSWORD: example_password
      MYSQL_DATABASE: mydatabase
      MYSQL_USER: myuser
      MYSQL_PASSWORD: mypassword
    volumes:
      - db-data:/var/lib/mysql
    networks:
      - mynetwork

volumes:
  db-data:

networks:
  mynetwork:
In this version:
A custom user-defined network named
mynetworkis defined under thenetworkssection.Both the
webanddbservices are connected to this custom network using thenetworksdirective.
This network allows the web service to communicate with the db service using their service names as hostnames (web and db, respectively). For example, in the web service's configuration, you can connect to the MySQL database using the hostname db.
To use this updated configuration:
Follow the steps from the previous example to set up the project directory, including creating the
docker-compose.ymlfile and theweb-contentdirectory.Open a terminal, navigate to your project directory, and run:
docker-compose upAccess your web application by opening a web browser and navigating to
http://localhost. The web service can communicate with the MySQL service using the hostnamedb.When you're done, stop and remove the containers using:
docker-compose down
Using a custom network in Docker Compose provides better isolation and flexibility for communication between services within the same application. Adjust the network configuration based on your specific requirements and the services you need to connect.
Docker compose with volume:
Certainly! Let's extend the previous examples by adding volumes to persist data for both the web and database services. Here's an updated docker-compose.yml file:
version: '3'
services:
  web:
    image: nginx:latest
    ports:
      - "80:80"
    volumes:
      - ./web-content:/usr/share/nginx/html
    networks:
      - mynetwork

  db:
    image: mysql:latest
    environment:
      MYSQL_ROOT_PASSWORD: example_password
      MYSQL_DATABASE: mydatabase
      MYSQL_USER: myuser
      MYSQL_PASSWORD: mypassword
    volumes:
      - db-data:/var/lib/mysql
    networks:
      - mynetwork

volumes:
  db-data:
  web-content:
In this version:
A named volume
web-contentis added for the web service, and the local./web-contentdirectory is mounted into the Nginx container.The
db-datavolume for the MySQL service is retained from the previous example.
This setup ensures that the web content and the MySQL data are persisted even if the containers are stopped or removed.
To use this updated configuration:
Follow the steps from the previous examples to set up the project directory, including creating the
docker-compose.ymlfile and theweb-contentdirectory.Open a terminal, navigate to your project directory, and run:
docker-compose upAccess your web application by opening a web browser and navigating to
http://localhost. The web service can communicate with the MySQL service using the hostnamedb.Stop and remove the containers when done:
docker-compose down
Customizing the volume configurations allows you to manage data persistence for your services. Adjust the volume definitions and mount points based on your specific requirements for data storage and sharing between containers.
Cheet Sheet:

As you stand on the shores of Docker knowledge, remember that your journey continues. There's always more to explore, from advanced Docker features to integrating Docker with CI/CD pipelines.
Celebrate this milestone, Docker Hero! Your dedication to mastering Docker is a testament to your commitment to the world of DevOps and containerization. Onward to new Docker adventures and the countless possibilities that await! 🚢🌐 #DockerHero #DevOpsJourney #ContainerizationMastery 🐳🚀